Clickety-clickety-clickety-krrzz-krrrrrrrz-clickety-clickety was the sound that started coming out my wife’s laptop the other day.
If you hear this sound from your laptop’s hard drive then I am afraid it’s end is near. It is time for a full back-up and hard drive replacement.
1. Copying data files to an external HD or another PC
This turned out to be the most time consuming part of the hard drive replacement.
I had made regular backups but wanted the latest data so chose to copy everything important manually.
Windows Explorer copy is very poor as it does not support resume, nor does it show a detailed progress. Since you are copying from a defect hard drive there are bound to be several file errors and you will need all the help you can get.
Secure Copy 2 from Pineda Networks is a better tool for the job. It is a bit unstable but free, allows resuming of file transfers and gives detailed progress information.
2. Purchase a spare identical or similar HD
To find out what hard drive model your laptop is using right-click on “My Compyter”, select properties, then Hardware, then Device Manager and check the drive(s) under Disk drives.
Google for the drive model and see if it is for sale.
In my case the drive was a 40GB Toshiba MK4004. I was not able to find that exact model but a MK4006 seemed to be a replacement. There were 60GB drives available. While that would have been a nice upgrade I could not gurantee that the larger drive would work with the VAIO system restore disks.
Cost of drive: £85.
3. Install the new HD
Do not attempt at opening your laptop if you are not comfortable with screwdrivers, fiddly electronic contacts and the possibility of destroying the laptop.
With the replacement hard drive in hand you should be able to take the laptop and drive to a back alley computer shop and have it replaced for a bargain price.
If you attempt at replacing the drive yourself I recommend you to do a dry run even before purchasing the replacement drive.
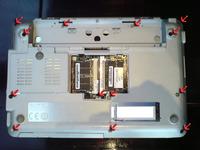 Start with the laptop closed and with the bottom side up. Unscrew all 13 screws and note the sizes and locations as there are 2 different sizes.
Two of the screws are hidden under the (top) rubber pads. Peel them off with a screwdriver. When you put them back they will stick to the case just as before.
 Turn the case around and open it. You should be able to lift the top of the bottom part. If it doesn’t it means you have forgotten one or more screws.
Don’t attempt to take of the top completly because the keyboard is attached to the bottom part and you don’t want to mess with those connectors. Just lifting it will be enough to get at the drive.
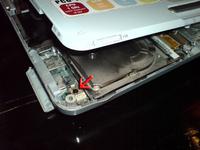
Unscrew one last screw which holds the frame around the frame (see arrow above).
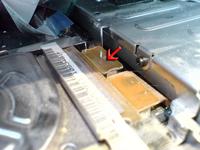 Take away the frame and disconect the hard drive connector (see arrow above).
The drive is now free to be lifted away. It is surrounded by four little rubber pads which you need to move to the new drive.
It is a bit tricky placing in the new drive with the rubber pads on the sides so have patience and be careful. Replace the frame around the drive and the screw that holds it down.
You can now close the case and put all the screws back.
4. Restore the data
With a VAIO laptop you should have restoration disks which are a quick way of putting back the operating system and any proprietary software.
I chose not to install any of the VAIO extras as I believe they only slow down the computer.
Continue with installing any previous software and finally replace the backed up data.
Don’t forget to run Windows Update as soon as you can. Installing Service Pack 2 and 95 other critical Windows updates was quite the exercise.
If you at a later point need to restore data from the removed HD then have a look at external 1.8″ or 2.5″ USB hard drive enclosures.
Connecting via USB 2.0 very convinient as it doesn’t require the opening of your PC case to connect the hard drive via a HD adapter.
External enclosures are only £10 on eBay, shipping included!
PS I have one spare screw after replacing the drive so please do a better job than me and let me know which screw is missing from the photos above!
Skip to content

Online journal and ponderings about the Internet, gadgets and photography.
“Don’t attempt to take of the top completely because the keyboard is attached to the bottom part and you don’t want to mess with those connectors. Just lifting it will be enough to get at the drive.”
You have to be careful with that. If you split the laptop case too much, you can disconnect the keyboard or other cables and the laptop will not function properly. In this case you’ll have to take it apart in order to reconnect cables, so be careful.
It’s not very common to have a hard drive buried inside the laptop, usually it’s easily accessible from the bottom.
Here’s some help for Toshiba laptop owners. I’ve created over 50 Toshiba laptop disassembly guides, you can use them if you want to repair the laptop yourself.
Toshiba laptop disassembly guides
My guides are free and you can use them at your convenience.
Ohhh… the squeak of death (click-scratch-click). What if your drive dies before you managed to restore the data?
This happened to me before with an IBM Deskstar (I mean, DEATHSTAR) HD… Luckily I was able to revive my HD by replacing the logic board (for the non-techies: the external circuit bit where you connect the cables). But you must be able to get a circuit board from another EXACT HD (i.e.: same model/revision) which is often quite hard!
Luckily I managed to find a guy in the US who had a brand new HD which was the same model and revision. In fact it was even from the same BATCH (same manufacturing plant and month/year) — it as like my old’s HD lost Siamese twin.
As soon as the new HD arrive, I swapped the circuit boards and voila! I could fetch all the data from the old revive HD to a brand new SEAGATE Barracuta 500GB Serial ATA. After the operation was complete, I re-swapped the logic boards from the IBM disks, dumped the trashed IBM on the bin and kept the new IBM drive wrapped for “future use”. But really, should I use a drive that is VERY, VERY likely to fail? Perhaps I could sell it on ebay to other unfortunate deathstar owners.
To avoid problems like these, I am currently reviewing Network Attached Storage (NAS) solutions with RAID. I think I might go for an IRFANT NAS RAID system.
For accessing data form removed HDs, I instead use a ATA/SATA 3.5/2.5 adapter that I got from some website.