Quik using Google photos and resolving app crashes

I love the GoPro Quik mobile application to create video and photo compilations from trips and events.

First I tried downloading all the items from Google Photos to a computer but the desktop version of Quik is nothing like the mobile app so don’t even try it. I then uploaded all the items to the mobile but Quik has a display bug and only showed 40 or so items from the same day and I wasn’t able to select all the required items.

In the end I was able to figure out a workflow that makes it possible to use older and shared photos that aren’t on your device. The functionality is a bit buggy but I was able to find workarounds for everything.

1. Create an album with the photos and videos you would like to use for your compilation. Curate and select just the items you would like to be in your Quik compilation.

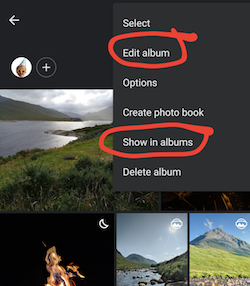
2. Optional step: The “+ create a new album” option will not be available if you are using photos added by others. Instead you will want to use the Share button so that a link to your new album is created (make sure to save the link!). The album is not visible in your albums so use the link in a browser and this should open the album in your Google Photos app. Edit the album and give it a name. Also select to “show in albums” to make it visible in your Google Photos albums.
Screenshot_20200104-182816~2.png

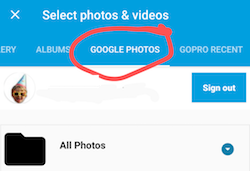
3. Open the Quik app and select to use Google Photos. Your new album should be listed. You may get errors such as “Google Photos is not available”. If you do, close the Quik app and try again… and again.
Screenshot_20200104-183059.png

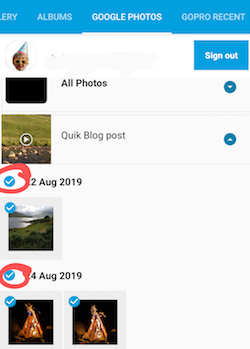
4. Select all photos by ticking all the days. Since you have already curated your items you can just select everything.
Screenshot_20200104-183244.png

5. Hit the blue arrow and Quik will start downloading everything to your device.

6. The Quik app will then crash continuously when it tries to edit the compilation.

7. Delete the project (Quik will crash again), start a new project and select all items again from the Google Photos album. This time the download will be almost instant and editing of the compilation will work.
8. Once done, export and upload your compilation back to Google Photos so that you can easily share it with friends and also so that you will never lose it if/when you lose your phone

Other tips for Quick:
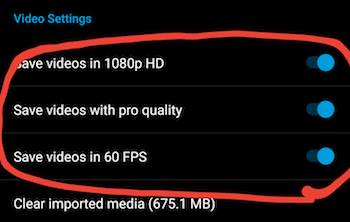
  • Select “high quality” to produce 1080p videos that look great on a TV.
    Screenshot_20191226-181620~2.png
  • Crop tall videos to include the important areas, for example people’s faces.
  • Use the focus point option to select what to show in photos
  • Duplicate any tall photos and use different focal points to show everything in tall photos.
  • If you have many items in your compilation then modify the duration of the compilation to the maximum of your selected music to have more time on each item.
  • If a photo that you like just flashes by you can change the duration to longer to see more of the photo (or to shorter if you want to see less of it).
  • Trim videos and select “manual” to choose what parts of a video you want included. Split the video if you want to show multiple bits from it.
  • Using “Highlights” can work better on longer action videos
  • You can mute your video sound if it doesn’t mix well with your selected music
  • Turn Outro off to remove the Quik logo at the end of your compilation (it gets old quickly).

Enabling new Google photo face and people search in UK, Europe, Germany

gp_logo.pngGoogle Photos was re-launched recently during a slick presentation at Google I/O 2015.
Besides the unlimited storage for 16MP photos and 1080p videos what caught my interest the most was the demo of the face and people search.
The new product was not only able associate photos of the same person, it was also able to do it across a large age span of the person.
google_photos_people_face_search
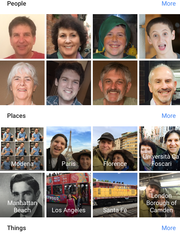
Some reported examples are “it associated photos of my niece starting with her current age of 6 years and all the way back to 3 months old” and “it was able to discern our twin daughters”.
So imagine my disappointment after upgrading to this latest Google Photos version, backing up my entire photo catalog (30,000+ 16MP photos) and not being able to find the face/people search.
I suspected some European or UK privacy laws being the root cause why Google hasn’t enabled it in the UK and a few searches later my suspicion was confirmed.
Since it seemed to be geographically restricted I was curious to see what would happen if I tried the application from another location.
Virtual Private Networks, a.k.a. VPN, are very handy to make your internet traffic to appear from a different location than you are.
All your traffic is tunneled to an exit point of your choosing, for example a data center in New York City. To Google Photos service you then seem to be located in New York City, USA.
tunnelbear.jpgOne such easy to use VPN service for android is Tunnelbear but there are many others. Tunnelbear offers 500 MB of free traffic and you don’t need much more than 20MB to get this set-up.
It worked, I got face/people search in my Goole Photos android app and this is how I did it:
In summary you want to delete the Google Photos application data and re-start the application while being connected to the VPN. This will trick Google Photos into believing you are located in US and the feature will be switched on.
Once the feature is switched on you don’t have to re-connect to the VPN; the feature will remain on!
Detailed instructions: delete the data from Google Photos, turn on airplane mode, turn off location services, connect via Tunnelbear, start up Google photos, go through the introductory 4 steps, go into settings and turn on “Group Similar Faces”. Success, you now have your photos organised by many, many different people present in them.
The face categorisation appeared as soon as I connected via VPN. There was no initial time for google to build up a face database for my photos.
This really seems to suggest that all photos added to Google Photos are categorised by face. The search feature is just hidden in certain geographical locations to comply with local laws.
Is this really in the spirit of the law or just cheat? You decide!

Clean install of OSX Lion on your Mac but keeping documents and applications

lion_logo.png My Macbook Pro ground to a halt after 6 months of heavy usage.
It started to freeze up frequently preventing it to load anything from the hard drive. Things that already were in memory continued working but accessing anything from the hard drive or unlocking the screen saver took up to 2 minutes. Not even “ls -l” worked.

A quick visit to the Genius Bar and after running many hardware diagnostics test it was diagnosed as a software error. They weren’t sure whether it was a problem just with the user account or whether it was in the system so the recommendation was to reinstall OSX.

Since OS X Lion (10.7) was out I thought I might as well install that rather then re-installing Snow Leopard (10.6).

Call me old fashioned but I don’t trust OS installations over older OS installations. I prefer fresh installs from removable media so I starting looking for a method to install OS X Lion from fresh but it wasn’t as easy as it should be!
By installing the OS X Lion on a new partition on the hard drive I was able to keep all my documents and application and move them across when needed.

What you need:

  • OS X Lion installer (purchased from Apple store)
  • An empty recordable DVD (it may be possible to install Lion from USB but I haven’t tried that)

First you need to create a start-up DVD from the OS X Lion installer. The trick is to find “InstallESD.dmg” inside the Lion installer. You can navigate items inside the installer by choosing “Show package contents”.
InstallESD
WARNING: The OS X Lion installer is deleted after you have installed Lion so make a back-up copy of it for future use!

Insert the blank DVD and choose to start Disc utility.
lion disc utility
Drag InstallESD.dmg to left-hand side of the Disc Utility, select the newly added InstallESD.dmg and hit Burn (and Burn again). It will take around 10 minutes to burn and verify the DVD.

Time to restart your Mac. Hold down Alt (Option) when booting to be presented with what media to boot from. The DVD should be visible after a short spin-up of the drive.

You can choose to install OS X Lion over your older version but this will delete all your files and applications. Instead you may want to consider keeping your old installation and install Lion onto a new partition.

Once booted into the Lion installer, don’t click continue but rather select Disc Utility from the top bar. Shrink your old partition to minimum possible, create a new partition in the newly created space and continue with the OS X Lion installation into that partition.

The installtion takes a good 30 minutes but once you have re-started and logged into Lion, your old partition is visible and you can copy items from it.

If you were using File Vault to encrypt your documents you have to navigate to /Users/<user name>, show content, double click on “sparsebundle”.

You will be asked for your original password and it will be mounted as a new image. You now have access to your old documents and application settings.

Most application you can simply drag from /Applications on the old partition but first copy the application settings (bookmarks, settings, accounts, passwords and etc). There are two places where the old application settings live:
<user home>/Library/Application Support/<application name>
<user home>/.<application name>

You need to show hidden files for this. You can enable hidden files by entering the following in a terminal window:
defaults write com.apple.Finder AppleShowAllFiles YES
Good luck and enjoy a clean install of OS X Lion (10.7)

KB941644 and Event ID 4226 patch

The latest critical Windows update from Microsoft (KB941644) is a fix to TCP/IP to prevent possible remote code execution.
The Microsoft Security Bulletin MS08-001 explains that there are two reported vulnerabilities in TCP/IP and that an attacker could take complete control of an affected system and install programs and view data.
The bad news is that the critical update will replace your TCPIP.SYS and thus reset the amount of half-open connections back to 10.
The good news is that the LlvLord patch will work on this new version of TCPIP.SYS and you can yet again increase the half-open connections (I recommend a value of 100-500).
Read more about the limited half-open connections and how it can slow down your network applications (especially BitTorrent).

Replacing a VAIO laptop (TR2MP) hard drive

Clickety-clickety-clickety-krrzz-krrrrrrrz-clickety-clickety was the sound that started coming out my wife’s laptop the other day.
If you hear this sound from your laptop’s hard drive then I am afraid it’s end is near. It is time for a full back-up and hard drive replacement.
1. Copying data files to an external HD or another PC
This turned out to be the most time consuming part of the hard drive replacement.
I had made regular backups but wanted the latest data so chose to copy everything important manually.
Windows Explorer copy is very poor as it does not support resume, nor does it show a detailed progress. Since you are copying from a defect hard drive there are bound to be several file errors and you will need all the help you can get.
Secure Copy 2 from Pineda Networks is a better tool for the job. It is a bit unstable but free, allows resuming of file transfers and gives detailed progress information.
2. Purchase a spare identical or similar HD
To find out what hard drive model your laptop is using right-click on “My Compyter”, select properties, then Hardware, then Device Manager and check the drive(s) under Disk drives.
Google for the drive model and see if it is for sale.
In my case the drive was a 40GB Toshiba MK4004. I was not able to find that exact model but a MK4006 seemed to be a replacement. There were 60GB drives available. While that would have been a nice upgrade I could not gurantee that the larger drive would work with the VAIO system restore disks.
Cost of drive: £85.
3. Install the new HD
Do not attempt at opening your laptop if you are not comfortable with screwdrivers, fiddly electronic contacts and the possibility of destroying the laptop.
With the replacement hard drive in hand you should be able to take the laptop and drive to a back alley computer shop and have it replaced for a bargain price.
If you attempt at replacing the drive yourself I recommend you to do a dry run even before purchasing the replacement drive.
open vaio laptopStart with the laptop closed and with the bottom side up. Unscrew all 13 screws and note the sizes and locations as there are 2 different sizes.
Two of the screws are hidden under the (top) rubber pads. Peel them off with a screwdriver. When you put them back they will stick to the case just as before.
open vaio laptopTurn the case around and open it. You should be able to lift the top of the bottom part. If it doesn’t it means you have forgotten one or more screws.
Don’t attempt to take of the top completly because the keyboard is attached to the bottom part and you don’t want to mess with those connectors. Just lifting it will be enough to get at the drive.
Unscrew one last screw which holds the frame around the frame (see arrow above).
open vaio laptopTake away the frame and disconect the hard drive connector (see arrow above).
The drive is now free to be lifted away. It is surrounded by four little rubber pads which you need to move to the new drive.
It is a bit tricky placing in the new drive with the rubber pads on the sides so have patience and be careful. Replace the frame around the drive and the screw that holds it down.
You can now close the case and put all the screws back.
4. Restore the data
With a VAIO laptop you should have restoration disks which are a quick way of putting back the operating system and any proprietary software.
I chose not to install any of the VAIO extras as I believe they only slow down the computer.
Continue with installing any previous software and finally replace the backed up data.
Don’t forget to run Windows Update as soon as you can. Installing Service Pack 2 and 95 other critical Windows updates was quite the exercise.
If you at a later point need to restore data from the removed HD then have a look at external 1.8″ or 2.5″ USB hard drive enclosures.
Connecting via USB 2.0 very convinient as it doesn’t require the opening of your PC case to connect the hard drive via a HD adapter.
External enclosures are only £10 on eBay, shipping included!
PS I have one spare screw after replacing the drive so please do a better job than me and let me know which screw is missing from the photos above!

Leicester Square, London is getting free WiFi

London’s Leicester Square is getting free WiFi courtesy of the PR firm Four Communications.
It is an 8Mbps service whose only restriction is that you use it “fairly”. The SSID (network ID) is Four’s Free Hotspot.
London, welcome to the 21st century and let this be the first of many free Internet access points.
[Via Shiny Shiny]

Fixing a processor with a broken pin

amd64 x2 4800 broken pin processorAt first I was grandiosely excited about the shiny new dual core AMD 64 X2 4800 processor I was about to upgrade my system with. Then I was bombastically disappointed when the computer did not start up after I had fitted the new processor on the motherboard.
After checking that all kinds of sockets, cables, wires and buttons were in place I removed the CPU to see if it had possibly been inserted inadequately.
To my horror I noticed that one of the minisculus processor pins had been bent all the way down to the surface of the processor.
In my 10 years of building custom computers and therefore fitting aplenty of CPUs, this was the first time something had gone as horribly wrong.
I accredit it to the fact that it was late in the night, I had had a double (single malt) scotch and I was too lazy to move the PC to a flat surface so I was fitting the CPU in a 45% angle.
Not giving up instantly, I tried straightening the pin with a tiny screwdriver but it snapped like only a dry stick could do.
For a brief moment I suspected that maybe the CPU had come like this from the shop but realised that no warranty return was possible after having further mutilated the CPU myself.
I decided to cut my losses and put the CPU up for auction on eBay clearly stating that it was not working. Then I proceeded to ordering a second AMD 64 X2 4800 from the same shop.
The following day I started looking into ways of repairing a broken pin on a processor. Just out of curiosity because a) the replacement processor was on the way and b) I didn’t really think it was possible.
Almighty Google came up with a few possible solutions:

  • give it to a gold smith; he might give it a go if he is brave enough (or silly enough I thought)
  • break of a pin from an old VGA cable and drop it into the socket in exact position where the CPU is missing the pin
  • try super-gluing the pin back on the processor
  • there is a myth of some guy in the USA that fixes broken pins for $50
  • the missing pin may not be used by the system so try the processor again

Only the last suggestion sounded like any fun so off I went to the AMD website for detailed specifications on the socket 939.
Figuring out the name of the missing pin was a bit confusing due to the orientation of the CPU but at last I had a position; AF-12 aka [STRAP_HI_AF12].
Looking up the functionality of that position I struck gold.
The specification said “Not used by the system” for that location. Two other locations said the same thing so this seemed to be a 0.5% (1 in 200) chance.
So I attempted a second, careful, insertion of the processor and the PC booted up like a champ. I ran a few tests and benchmarks and all indicated that the processor was working just fine.
Then there was the dilemma of the replacement processor being on the way and the auction stating non-functional processor whereas it was now seemingly fully working.
Luckily enough the shop had a “7 day cooling off” period within which you could return items without any hassle (still waiting for the refund though).
The auction was won by an Italian buyer who insisted that I tested the CPU before he would pay.
It did not matter how many times I wrote in poor Italian that the auction specifically said the item was not working so I could not give any guarantees.
I guess it worked out for the best that we decided not to trade since the handicapped CPU is now running my PC and doing well. I am getting quite attached to it actually.
So the moral of the story is twofold:
Don’t be a meat head when inserting a new processor and if things go wrong, don’t despair until you have Googled it!

Still an Ubuntu virgin I am

ubuntu logo
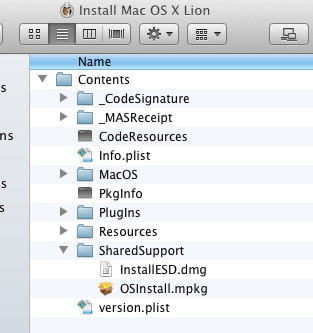
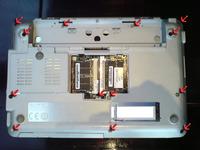
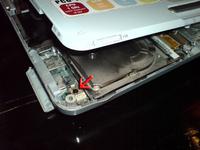
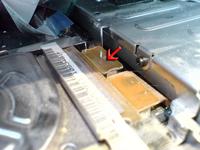
I had this idea of trying to resurrect an old Sony VAIO laptop (PCG-Z600TEK) with a free distribution of Linux OS. The laptop is to be used as a wireless picture frame if all goes well.
The laptop had previously suffered from intermittent HD crashes and had been collecting dust in a cupboard for a good 2 years.
Weighing in at just 700Mhz and 256 MB of RAM, it is fairly weak by today’s standards and I had a feeling that the original Windows 2000 was too much for it.
Ubuntu is a very popular Linux distribution at the moment so I decided to follow the masses and give it a try.
The download was easy as can be but the problems started shortly afterwards because no matter what I did I was not able to burn a single distribution properly.
All in all I tried 4 distributions (AMD64 server/desktop and i386 server/desktop), 3 Cd/DVD authoring software packages, 2 CD-RW drives on two different PCs and about 10 different CDs (two different brands). None was successful!
If you are planning on giving Ubuntu a try, the first thing to check is the check sum of the distribution after the download. This is to ensure that the download was 100% successful.
On Windows you can use the free digestIT or MD5Sum . If you are using Firefox there is a MD Hash Tool extension available.
Compare the generated MD5 check sum with the official Ubuntu MD5 check sums. If there is a discrepancy re-download.
Second step is to burn the ISO distribution to an empty CD. Various CD/DVD authoring can do this, e.g. Nero burning Rom, Alcohol 120% and the free CDBurnerXP Pro.
Using slower burning speed (1-8x) should help towards a successful burn but it didn’t in my case.
Once burned, pop the CD in your CD drive, make sure to enable booting from CD/DVD (optical drive) in your BIOS and restart you computer.
Make sure to select “Check CD integrity” in the Ubuntu menu as a first thing. This is where it was reported over and over that my CD was corrupted.
I have posted a few questions on the Ubuntu forums and maybe there will appear a workaround at some point. Until then the Sony VAIO laptop will be collecting some more dust.
Heard on Slashdot: Ubuntu is an ancient African word, meaning “can’t configure Debian”.
Update
One more disc burned and tested on a third PC (Dell Latitude D505) and Ubuntu booted up properly. It appears that the Ubuntu 6.06 is very sensitive about hard ware being used.
From a quick tour of Ubuntu 6.06, Linux on the desktop has come a long way. It was responsive, esthetically pleasing and with all that Unix goodness.
Short lasting experience though. The Dell Wireless TrueMobile 1350 WiFi card is not supported natively and I was not in a mood making it work with the ndis wrapper.
A memory test on the VAIO showed severe problems so no wonders Ubuntu did not boot up on it.

Windows XP SP2 and Event ID 4226

Update 10 April 2007
It looks as if Windows Vista comes with similar half-open outbound connections limit as Windows XP SP2 did. In fact Vista Home Basic is even more limited with only 2 connections allowed!
Torrentfreak has a great write up on how to patch Windows Vista (32/64-bit) to increase the TCP connections and improve your BitTorrent (p2p) experience.
If you are using Windows XP, you must have noticed all the fuss about Service Pack 2. It introduced an array of security “enhancements”: dual direction firewall, several long overdue IE improvements, memory protection and the crippling of the TCP/IP stack.
Hang on, how is crippling of the TCP/IP stack a security enhancement?
Windows XP SP2 limits half-open connections (SYN) to a maximum of 10 (the previous limit was over 65,000). This is supposed to slow down certain viruses because their spreading strategy is to try to connect to a high amount of random IP numbers.
The drawback with this connection limit is that other legitimate network intensive applications can be slowed down as well. Applications like security network scanners, peer-to-peer (P2P) applications or a combination of network applications that a power user may be using (VPN, FTP, p2p, RDP, SSH, “Firefox on steroids” and more).
To me it sounds awfully lot like treating the symptoms instead of the cause which would have been to tighten up Windows security to prevent virus infections in the first place.
#PAGEBREAK#
There is a way to tell whether your daily networking activities are being affected by the patch. Each time your computer tries to establish more than 10 half-open connection, a system event will be logged in Windows. It looks something like this:

EventID 4226: TCP/IP has reached the security limit imposed on the number of concurrent TCP connect attempts


Access the event viewer by Start / Control Panel / Administrative Tools / Event Viewer / System. Sort by Event and scroll down to 4226. If you only have a few occurrences, I would not worry about it but if you see many daily occurrences it’s time to look into why they are appearing.
There are two scenarios:
1. You computer may be infected with a virus/worm that is trying to spread
2. You are a networking power users and your applications are being stalled by the XP SP2
If you have anti virus software running and you scan your computer regularl ywith anti-spyware software like AdAware then case 1 is not likely.
#PAGEBREAK#
You can find out which process is responsible for the many half-open connections with the command ‘netstat -no | find "SYN"’. Half-open connections will have a state of other than ESTABLISHED. Note the PID (process id), open Task Manager and locate the process and application responsible for the half-open connections.
The second case means that SP2 is stalling your work. An unofficial patch will modify the locked tcpip.sys and let you set the limit to whatever you wish. 50 half-open connections is a reasonable limit or you can set the limit back to 65,535 which it was before the SP2. The patch is called EventID 4226 Patcher and can be found on LVL Lord’s web site: LVLlord downloads.
Certain Microsoft updates may replace the TCPIP.SYS with a new locked version but LVLLord has been quick on updating the patch. When you run the patch, it will tell you how many connections are currently allowed.

Apple eye candy for Windows: Konfabulator

konfabulator
Last year I noticed a Mac OS application that looked very sleek and I wished it would run on Windows. This month my wish came through.
Konfabulator is an engine that runs in the background and updates various widgets placed on your desktop. These widgets display information about your computer or information fetched from the Internet.
The installation comes with 15 default widgets to update you about the weather, time, WiFi strength, CPU usage, photo frame and more. On the Konfabulator gallery page you will see that people from around the world have contributed with hundreds if not thousands of widgets to perform all kinds of tasks.
One common characteristic of the widgets is their design. It is pure eye candy combined with high functionality. Fancy transparencies, docking to the side of your desktop, eye popping icons and much more previously only seen on Mac OS.
My current favourite widget is the standard digital clock in float mode and very high transparency. What is your favourite widget?